配置Github action自动生成静态文件
仓库要求
可以选择在
Github上部署2个仓库,当然也可以是一个仓库的2个分支,这里选择2个仓库,一个用来存放hexo生成的所有文件,一个用来保存静态文件.
SSH配置
如果你已经生成过公钥秘钥则可以省略.否则
ssh-keygen -t rsa -C "your_email@example.com"存放位置
window=> C:\Users\用户名\.ssh你会看到私钥
id_rsa和公钥id_rsa.pub保存好自己的秘钥,不要泄露.
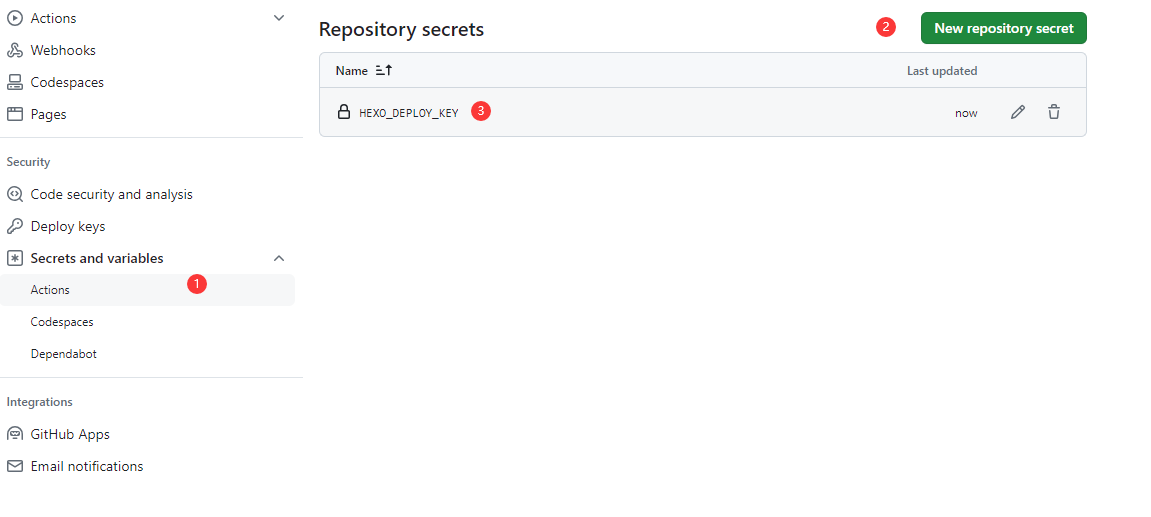
- 在源文件文件仓库的
Settings -> Secrets and vaiables -> Actions添加私钥,命名为HEXO_DEPLOY_KEY
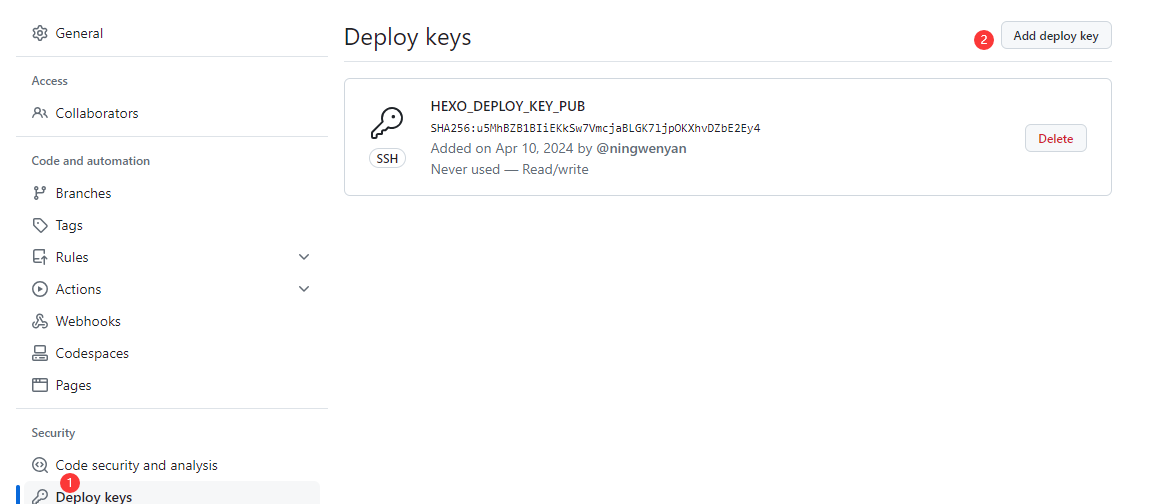
- 在静态仓库的
Settings->Deploy keys中添加公钥,命名为HEXO_DEPLOY_KEY_PUB,并选择勾选Allow write access
创建workflow
在本机
hexo目录.github创建workflow文件$ cd .github/ $ mkdir workflows $ touch workflows/hexo_deployment.yml文档内容
# Action 的名字
name: Hexo Auto Deploy

on:
  push:
    branches:
      - master

env:
  # 使用此 git 用户部署到 github 仓库
  GIT_USER: xx
  # 使用此 git 邮箱部署到 github 仓库
  GIT_EMAIL: xx@xx.com
  # 要部署到的分支
  GIT_DEPLOY_BRANCH: master

jobs:
  build:
    name: 环境部署
    runs-on: ubuntu-latest
    strategy:
      matrix:
        os: [ubuntu-latest]
        node_version: [18.x] # 自己的node版本

    steps:
      - name: 检查分支
        uses: actions/checkout@v3
        with:
          fetch-depth: '0'
        #with:
        #  ref: $GIT_DEPLOY_BRANCH

      # 安装 node.js
      - name: 安装 Node.js ${{ matrix.node_version }}
        uses: actions/setup-node@v3
        with:
          node-version: ${{ matrix.node_version }}
          # node_version: "18.x"

      # 配置环境
      - name: 配置环境
        env:
          # 配置的私钥标题
          HEXO_DEPLOY_KEY: ${{secrets.HEXO_DEPLOY_KEY}}
        run: |
          sudo timedatectl set-timezone "Asia/Shanghai"
          mkdir -p ~/.ssh/
          echo "$HEXO_DEPLOY_KEY" > ~/.ssh/id_rsa
          chmod 600 ~/.ssh/id_rsa
          ssh-keyscan -t rsa github.com >> ~/.ssh/known_hosts
          git config --global user.name $GIT_USER
          git config --global user.email $GIT_EMAIL
          npm install hexo-cli -g


      - name: Cache node_modules # 缓存 node_modules
        uses: actions/cache@v2 #
        id: cache-dependencies
        with:
          path: node_modules
          key: ${{runner.OS}}-${{hashFiles('**/package-lock.json')}}

      # 安装依赖
      - name: 安装依赖
        run: |
          npm install


      # 部署
      - name: 部署 Hexo
        run: |
          hexo clean
          hexo generate
          hexo deploy
修改_config.yml文件
将
deploy指定为git推送deploy: type: 'git' repo: git@github.com:Username/Repository
更新仓库
在根目录下执行
git add .
git commit -m "测试action"
git push orgin master
在
github源仓库中的action中查看执行情况,以下为成功,成功后即可在网站上查看,之后写markdown文档只需要推送到源仓库即可。
本博客所有文章除特别声明外,均采用 CC BY-NC-SA 4.0 许可协议。转载请注明来源 WenYan Blog!
评论


